
7 Mistakes You're Making with Custom Apparel Printing (and How to Fix Them)
- Janet Emma
- Oct 8, 2025
- 6 min read

Let's be honest: custom apparel printing looks easy until you're staring at a batch of shirts with crooked logos or faded designs. Whether you're running a small business or handling your first big order, these mistakes can cost you time, money, and customers. The good news? Most of these problems are totally fixable once you know what to look for.
Here are the seven biggest mistakes we see in custom apparel printing, plus exactly how to avoid them.
1. Getting Design Placement All Wrong
You've probably seen it: that logo sitting way too high on someone's chest, or a design that's completely off-center. Poor placement is one of the fastest ways to make professional-looking apparel look amateur. And when you're printing multiple pieces, inconsistent placement across the batch makes it even more obvious something went wrong.
The worst part? This mistake usually happens because people eyeball the placement instead of measuring. What looks right to one person might look totally off to someone else.
The Fix: Use placement guides or templates every single time. Seriously, invest in some proper measuring tools and templates for your most common designs. For chest prints, the general rule is 3-4 inches down from the collar seam for adult shirts, and about 2-3 inches for youth sizes.
Mark your placement lightly with washable pencil or use laser alignment if you have access to it. Pro tip: take photos of your first few pieces to check consistency before running the whole batch.

2. Choosing the Wrong Fabric for Your Printing Method
Not all fabrics play nice with every printing method, and this is where a lot of people mess up. You can't just throw sublimation ink on a cotton shirt and expect it to work: but people try it all the time.
Different printing methods need different fabric compositions to work properly. Sublimation needs polyester, screen printing loves cotton, and DTF works on pretty much everything. Get this wrong, and you'll end up with prints that fade, peel, or look terrible from day one.
The Fix: Always check your fabric composition before picking your printing method. Here's a quick guide:
Cotton or cotton blends: Great for screen printing, DTG, and vinyl transfers
Polyester: Perfect for sublimation, also works well with DTF and screen printing
Mixed blends: DTF and screen printing are your safest bets
If you're not sure about the fabric content, ask your supplier or test a small sample first. It's way better to spend a few extra minutes checking than to redo an entire order.
3. Using Low-Resolution Images That Look Terrible When Printed
This one's painful because the mistake doesn't show up until it's too late. That logo that looks crisp on your computer screen turns into a pixelated mess when it's printed actual size on a shirt. Low-resolution images are probably the #1 cause of customer complaints in custom t-shirt printing.
The problem is that what looks fine at thumbnail size falls apart when you blow it up to print dimensions. And once it's printed, there's no going back.
The Fix: Always use high-resolution images: 300 DPI minimum. If you're working with customer-provided logos or images, zoom in and check them at the actual print size before you commit to printing.
Here's a simple test: open the image at 100% zoom on your screen. If it looks fuzzy or pixelated there, it's going to look worse on fabric. Don't be afraid to ask customers for better quality files: most people would rather provide a new image than get a blurry print.
4. Getting the Print Size Completely Wrong
Size matters in custom apparel printing, but it's trickier than you think. A design that looks perfect on a medium shirt can look ridiculously huge on a youth small or way too tiny on a 3XL. This is especially common when people use the same design size across all garment sizes.
Getting proportions wrong makes even great designs look unprofessional. It's like wearing a shirt that doesn't fit: everyone notices.
The Fix: Scale your designs based on garment size. Here's a rough guide:
Youth sizes: Reduce design size by about 20-30%
Adult S-L: Standard sizing works fine
Adult XL and up: Consider increasing size by 10-20%
The key is maintaining visual balance. Step back and look at the whole garment: does the design look proportional to the shirt size? If something looks off, trust your gut and adjust.
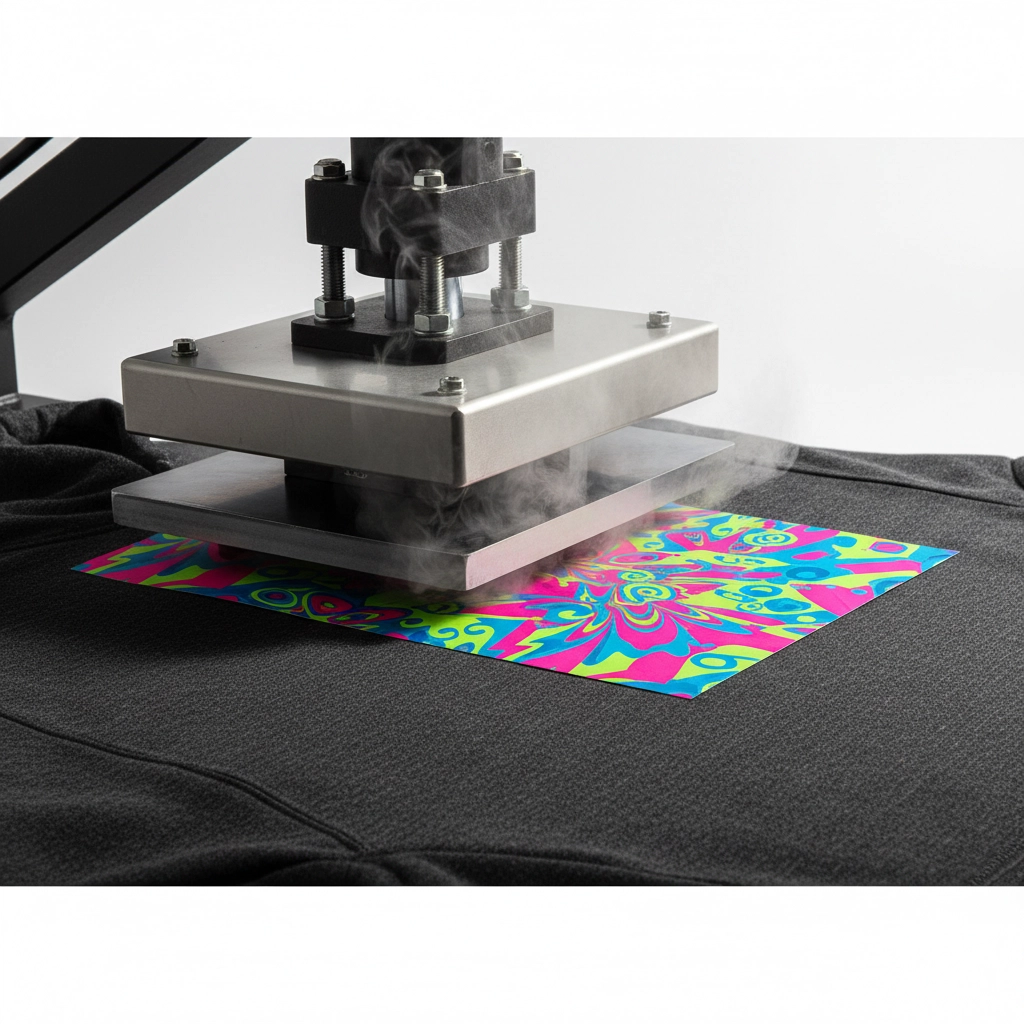
5. Messing Up Heat Transfers
Heat transfer vinyl (HTV) and DTF transfers seem straightforward, but there are so many ways to mess them up. Wrong temperature, insufficient pressure, not enough time, or trying to press over seams and collars: any of these can result in peeling, poor adhesion, or distorted designs.
The frustrating part is that heat transfer problems might not show up immediately. The print might look fine right after pressing but start peeling after the first wash.
The Fix: Follow manufacturer instructions exactly, but also do your own testing. Every heat press is different, and environmental factors like humidity can affect results.
Keep a log of what settings work for different materials. Test press a sample piece and wash it to see how it holds up. When working around seams or uneven surfaces, use a pressing pillow to create an even surface.
Most importantly, give transfers the full time and pressure they need. Rushing this step is where most problems happen.
6. Skipping the Testing Phase
Here's where a lot of people get burned: they trust the manufacturer's settings completely or rush straight into production without testing. Every combination of machine, fabric, and design can behave differently, and what worked perfectly last time might fail with a different material.
Skipping tests also means missing obvious problems like color issues or sizing mistakes that could be caught before wasting materials on a full production run.
The Fix: Always do test prints on the exact same material you'll use for production. This isn't optional: it's essential.
Test different temperature, pressure, and time combinations until you find what works best. Keep detailed notes so you can replicate successful settings later.
Also, create mockups and get customer approval before starting production. Show them exactly what the design will look like, where it'll be placed, and what size it'll be. A few extra minutes of proofing can save hours of reprinting.
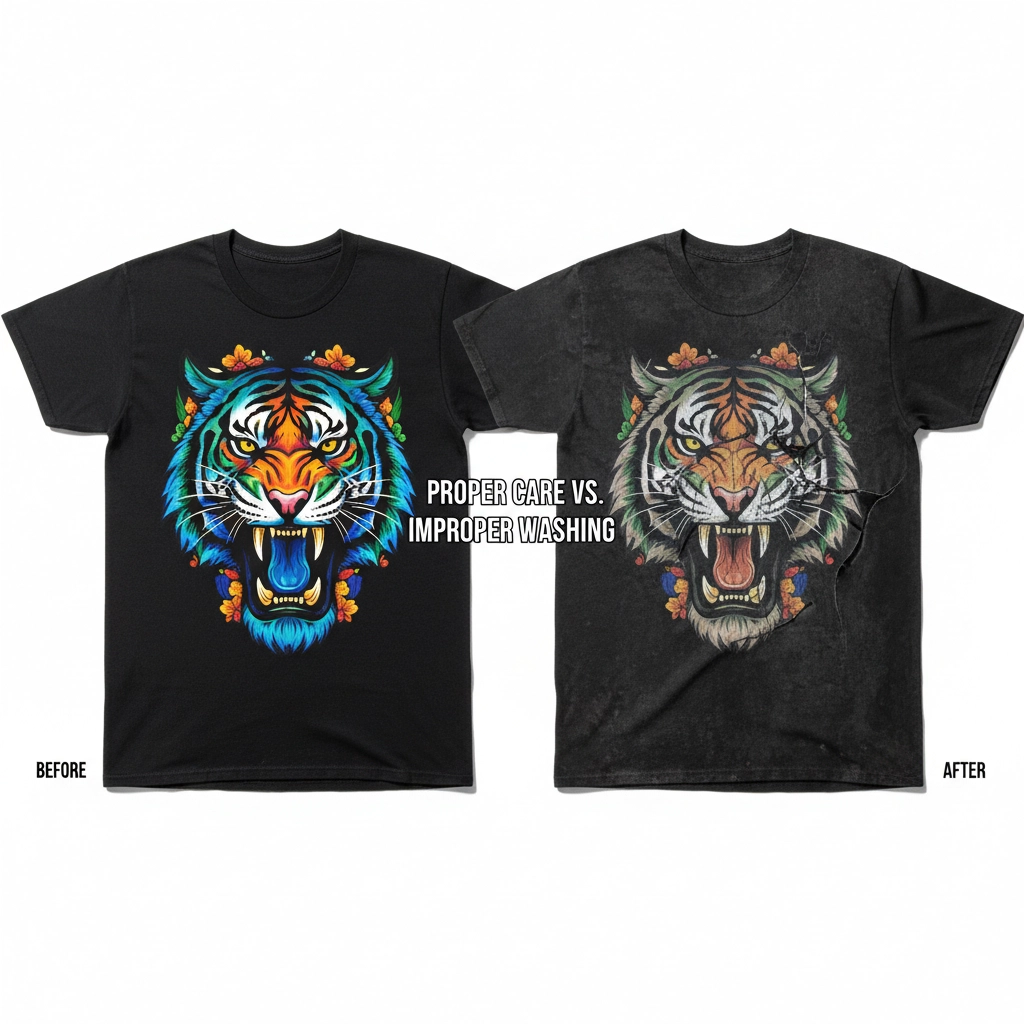
7. Ignoring Care Instructions
This mistake doesn't show up until after the customer gets their order, but it's a killer for repeat business. You deliver perfect-looking custom apparel, but the customer throws it in the washer with bleach and hot water, and suddenly your beautiful print is faded or cracked.
Even when the printing work is flawless, poor care can make it look like you did a bad job. And guess who gets blamed?
The Fix: Include clear care instructions with every order. Be specific:
Wash inside out in cold water
Avoid bleach and fabric softener
Air dry or low heat tumble dry
Don't iron directly on the design
Consider adding care tags to the garments themselves or including a care card with the order. Some shops even print care instructions on the inside of garments.
Educating customers about proper care protects your reputation and keeps them coming back for more orders.
Getting It Right Every Time
These mistakes might seem overwhelming, but most of them come down to the same thing: taking time to do things properly instead of rushing through the process. Measure twice, print once. Test before committing to production. Check your files before printing.
The good news is that once you develop good habits around these common problems, they become second nature. Your prints will look more professional, your customers will be happier, and you'll waste less time and materials on do-overs.
At Hard Re-Set Inc., we've seen all these mistakes (and made some ourselves when we were starting out). The key is learning from them and building systems that prevent them from happening again. Whether you're just getting into custom apparel printing or you've been at it for years, staying aware of these common pitfalls will help you deliver better results every time.
Ready to see what professional custom apparel printing looks like? Check out our work or browse our products to see the difference attention to detail makes.
Comments